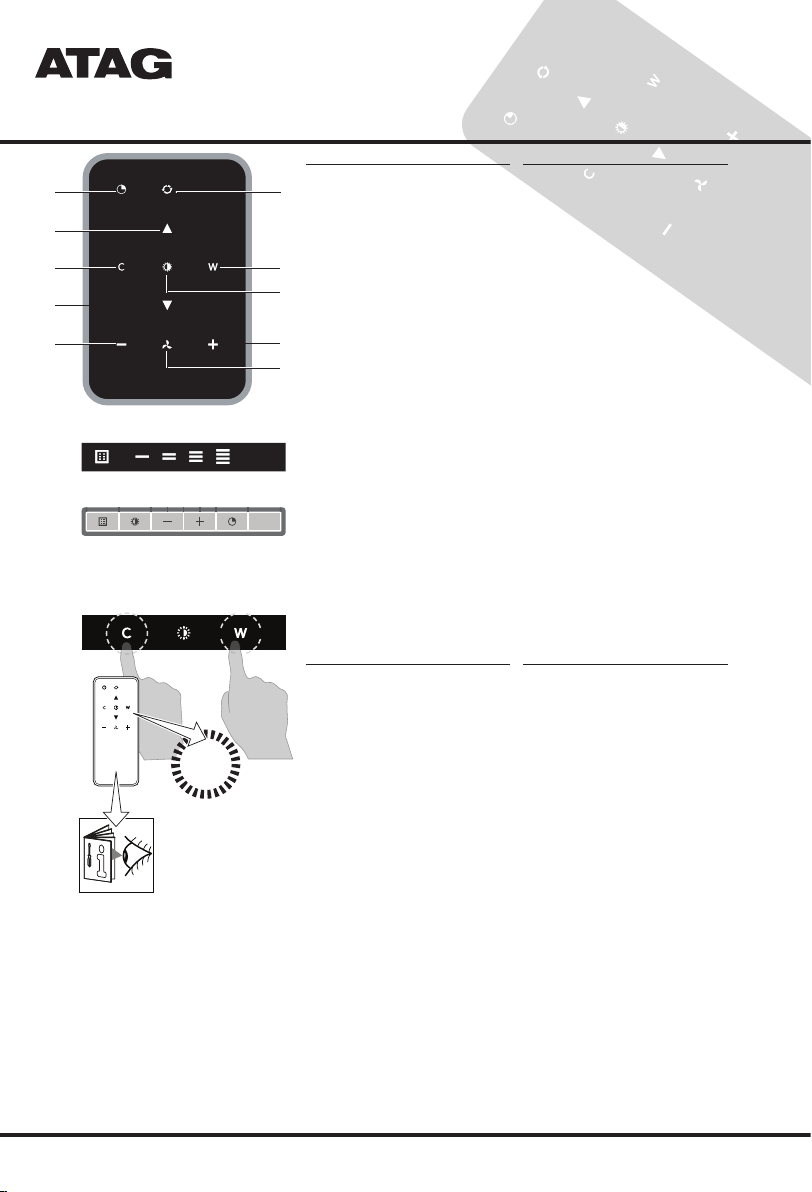
B. Button control: Press and hold ‘-’ and ‘+’ for 3
seconds. the hood will start ‘pairing mode’ for 5
minutes.
2. Remote control
• Activate the ’Remote pairing mode’ by holding
‘c’ and ‘w’ for 3 sec.
• During pairing all the indicators on the hood and
remote will blink.
All indicators will turn off when the connection is
established.
If the connection is not established repeat the
entire pairing process.
Remote control will go into standby after30
seconds. The remote will wake up whenitis
picked up or detects movement.
1. Timer-Funktion
2. Helligkeit erhöhen
3. Licht kälter machen
4. Helligkeit senken
5. Leistungsstufe verringern
6. Clean-Air-Funktion
7. Licht wärmer machen
8. Beleuchtung ein-/ausschalten (1 Sekunden)
9. Leistungsstufe erhöhen
10. Dunstabzug an/aus (1 Sekunden)
Koppeln der Fernbedienung
Die Fernbedienung muss mit der Abzugshaube
gekoppelt werden, bevor sie benutzt werden
kann.
1. Der Abzugshaube
A. Bedienfeld: Schalten Sie das Gerät ein. Die
Abzugshaube befindet sich nun 5 Minuten lang im
Kopplungsmodus.
B. Tastenbedienung: Schalten Sie das Gerät ein.
Halten Sie die Tasten „-“ und „+“ 3 Sekunden lang
gleichzeitig gedrückt. Die Abzugshaube befindet
sich nun 5 Minuten lang im Kopplungsmodus.
2. Fernbedienung
•Starten Sie den Kopplungsvorgang, indem Sie
„c“ und „w“ 3 s langgedrückt halten.
• Während des Kopplungsvorgangs blinken alle
Anzeigeleuchten auf der Abzugshaube und der
ernbedienung.
Sobald die Verbindung zur Fernbedienung
hergestellt ist, erlöschen alle Leuchten wieder.
Wenn die Herstellung der Verbindung misslingt,
wiederholen Sie den gesamten Vorgang noch
einmal.
Nach 30 Sekunden geht die Fernbedienung in
den Standby-Modus. Die Fernbedienung ist mit
einem Bewegungssensor ausgestattet und
wird automatisch aktiviert, wenn Sie sie in die
Hand nehmen oder bewegen.
1. Fonction minuterie
2. Augmenter l'intensité lumineuse
3. Refroidir la température lumineuse
4. Diminuer l'intensité lumineuse
5. Réduire la capacité d'aspiration d'air
6. Fonction Clean Air (air propre)
7. Réchauffer la température lumineuse
8. Marche/arrêt de l'éclairage (1 sec)
9. Augmenter la capacité d'aspiration d'air
10. Marche/arrêt du ventilateur (1 sec)
Associer la télécommande
Cette télécommande doit être associée à la hotte
aspirante avant la première utilisation.
1. Hotte aspirante
A. Panneau de commande : Démarrez l’appareil
(marche). La hotte démarrera en « mode
association » et le restera pendant 5 minutes.
B. Commande des boutons : Démarrez l’appareil
(marche). Appuyez sur les touches « - » et « + »
pendant 3 secondes. La hotte passera en « mode
association » et le restera pendant 5 minutes.
2. Télécommande
• Activez le « Mode association de la
télécommande » en appuyant sur les touches « c »
et « w » pendant 3 sec.
• Pendant l’association, tous les indicateurs de la
hotte et de la télécommande clignoteront. Tous les
indicateurs s’éteindront une fois la connexion
établie.
Si la connexion n’est pas établie, recommencez
l’ensemble du processus d’association.
La télécommande se mettra en veille après 30
secondes. La télécommande sortira du mode
veille lorsqu’elle est prise en main ou détecte
un mouvement.
FR
DE
EN
1. Timerfunctie
2. Lichtintensiteit verhogen
3. Hogere kleurtemperatuur
4. Lichtintensiteit verlagen
5. Afzuigcapaciteit verlagen
6. Clean Air-functie
7. Lagere kleurtemperatuur
8. Verlichting in-/uitschakelen (1 sec drukken)
9. Afzuigcapaciteit verhogen
10. Ventilator aan/uit (1 sec drukken)
De afstandsbediening koppelen
De afstandsbediening moet vóór gebruik met de
afzuigkap worden gekoppeld.
1. Afzuigkap
A. Gebruikersinterface: Schakel het apparaat in.
De afzuigkap blijft 5 minuten in de modus
Koppelen.
B. Button control: Schakel het apparaat in.
Houd de toetsen ‘-’ en ‘+’ 3 seconden ingedrukt.
De modus ‘Koppelen’ wordt ingeschakeld en blijft
gedurende 5 minuten actief.
2. Afstandsbediening
Houd ‘C’ en ‘W’ 3 seconden ingedrukt om de
modus ‘Afstandsbediening koppelen’ te activeren.
Tijdens het koppelen knipperen alle indicatoren op
de afzuigkap en de afstandsbediening.
De indicatoren worden uitgeschakeld wanneer de
afstandsbediening is gekoppeld.
Als de koppeling niet tot stand kan worden
gebracht, probeert u het opnieuw.
Na 30 seconden gaat de afstandsbediening in
de stand-bymodus. De afstandsbediening
wordt geactiveerd bij beweging, bijvoorbeeld
als u hem oppakt.
NL
V4 / 08042020
3
sec
1.
2.
A.
B.
Need help? Post your question in this forum.
Report abuse
Libble takes abuse of its services very seriously. We're committed to dealing with such abuse according to the laws in your country of residence. When you submit a report, we'll investigate it and take the appropriate action. We'll get back to you only if we require additional details or have more information to share.
Product:
Forumrules
To achieve meaningful questions, we apply the following rules:
First, read the manual;
Check if your question has been asked previously;
Try to ask your question as clearly as possible;
Did you already try to solve the problem? Please mention this;
Is your problem solved by a visitor then let him/her know in this forum;
To give a response to a question or answer, do not use this form but click on the button 'reply to this question';
Your question will be posted here and emailed to our subscribers. Therefore, avoid filling in personal details.
Register
Register getting emails for ATAG CU90555RM at:
new questions and answers
new manuals
You will receive an email to register for one or both of the options.
Get your user manual by e-mail
Enter your email address to receive the manual of ATAG CU90555RM in the language / languages: English, German, Dutch, French as an attachment in your email.
The manual is 0.49 mb in size.
You will receive the manual in your email within minutes. If you have not received an email, then probably have entered the wrong email address or your mailbox is too full. In addition, it may be that your ISP may have a maximum size for emails to receive.
If you have not received an email with the manual within fifteen minutes, it may be that you have a entered a wrong email address or that your ISP has set a maximum size to receive email that is smaller than the size of the manual.
The email address you have provided is not correct.
Please check the email address and correct it.
Your question is posted on this page
Would you like to receive an email when new answers and questions are posted? Please enter your email address.