682002
3
Zoom out
Zoom in
Previous page
1/34
Next page
3
®
4 EASY STEPS TO OPERATE YOUR ANGELCARE
®
MONITOR
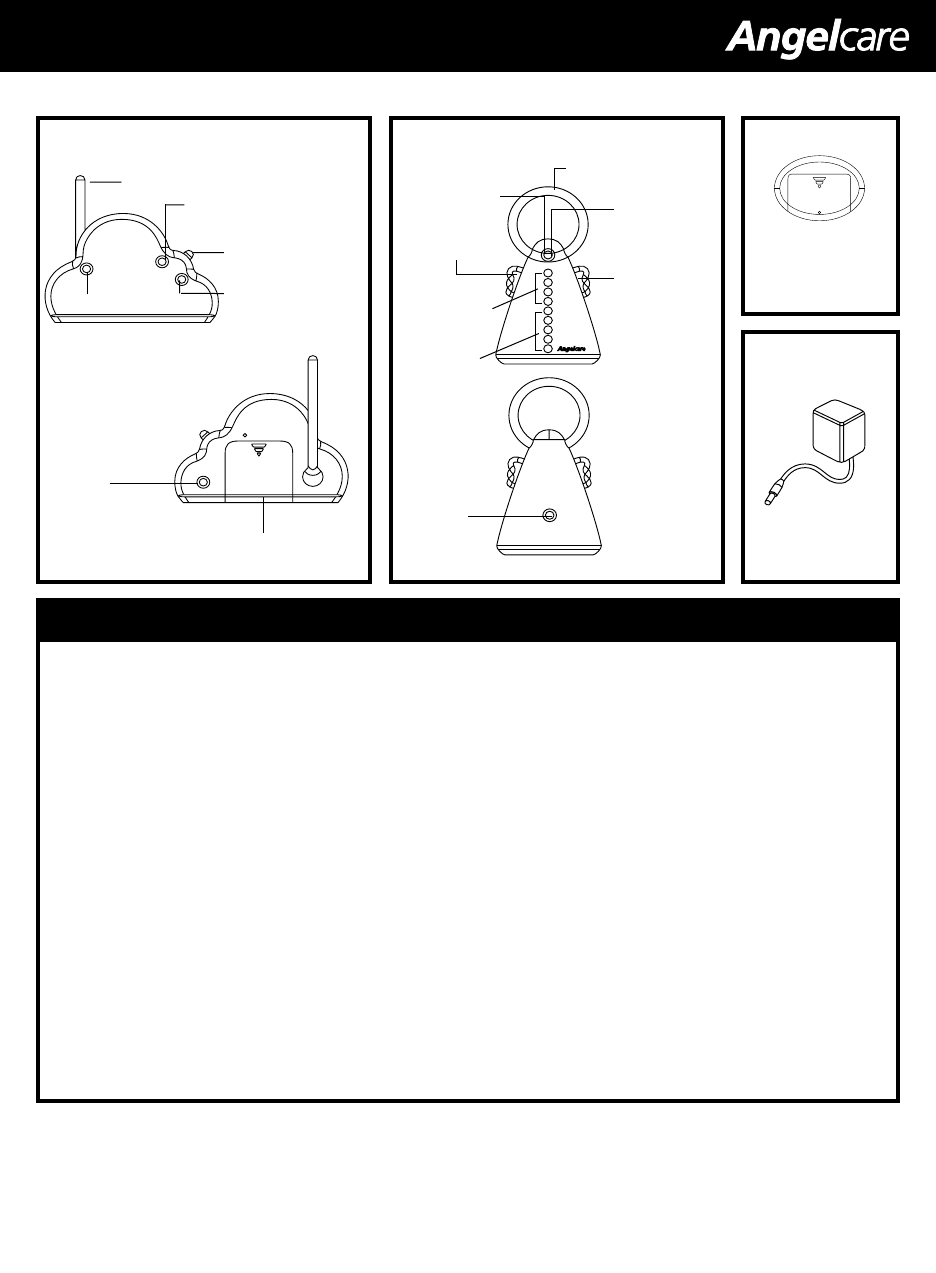
STEP 1. NURSERY UNIT (TRANSMITTER)
Insert 4 AAA batteries into Nursery Unit (for battery backup in case of power failure).
Connect AC adapter to Nursery Unit and plug adapter into an electrical outlet.
STEP 2. PARENTS UNIT (RECEIVER)
Model AC200: Insert 4 AAA batteries into Parents Unit. Or, connect AC adapter to Parents Unit and plug adapter to an electrical outlet.
Model AC200-R: The pre-installed Ni-Cad rechargeable batteries need to be charged for 15 hours continuously before first-time use.
To charge, connect the AC adapter to the Parents Unit. Plug AC adapter to an electrical outlet (Figure 4). The batteries will charge as long as it
is connected to a powered AC adapter. The position of the switches will not effect charging.
For longest battery life, only recharge the Parents Unit when the orange Low Battery light flashes.
NOTE: Only the Parents Unit is rechargeable in Model AC200-R.
Adjust the volume control to the desired level.
STEP 3. TO USE MONITOR
Place baby in crib and switch both units ON by selecting either channel A or B. If reception is not clear, switch to other channel.
Make sure both units are on the same channel.
To avoid feedback (whistling sound), keep both units at least 3 meters apart (10 feet).
STEP 4. BATTERY MODE
When unplugging AC adapter from each unit, make sure unit is switched OFF. Otherwise, unit will revert to battery mode.
The monitor will revert automatically to battery mode during a power failure. Insert batteries into Nursery Unit and Parents Unit
for Model AC200. When orange Low Battery indicator flashes, change batteries promptly (or recharge Parents Unit for Model
AC200-R).
Note:
Test your Angelcare
®
monitor BEFORE first-time use and then on a periodic basis.
The Angelcare
®
monitor is perfectly safe. The Nursery Unit emits only very low power radio signals through its antenna. These
signals do not present a safety hazard.
If you have questions or need help, please call your distributor, see page 32.
Figure 4
9 Volt AC Adapters (2)
Parents Unit
Adapter
socket
Battery comparment
Backup battery compartment
Antenna
Low battery indicator
(flashing orange)
Microphone
Power On/Off &
Channel A or B selector
Power On indicator (green LED)
Adapter
socket
Figure 1
Figure 2
Figure 3
NURSERY UNIT (TRANSMITTER) PARENTS UNIT (RECEIVER)
Nursery Unit
TM
Power ON/OFF &
Channel A or B
selector
Low battery
indicator
(flashing orange)
Power ON indicator
(green LED)
Antenna
Volume control
selector
Sound level
indicators
(red LEDs)
Speaker
Bottom view of
Parents Unit
3


Need help? Post your question in this forum.

Forumrules


Report abuse

Libble takes abuse of its services very seriously. We're committed to dealing with such abuse according to the laws in your country of residence. When you submit a report, we'll investigate it and take the appropriate action. We'll get back to you only if we require additional details or have more information to share.

Product:

For example, Anti-Semitic content, racist content, or material that could result in a violent physical act.

For example, a credit card number, a personal identification number, or an unlisted home address. Note that email addresses and full names are not considered private information.

Forumrules

To achieve meaningful questions, we apply the following rules:

Register

Register getting emails for Angelcare AC200-R at:


You will receive an email to register for one or both of the options.


Get your user manual by e-mail

Enter your email address to receive the manual of Angelcare AC200-R in the language / languages: English, German, Dutch, Danish, French, Portuguese, Swedish, Spanish, Norwegian, Finnish as an attachment in your email.

The manual is 0,4 mb in size.


You will receive the manual in your email within minutes. If you have not received an email, then probably have entered the wrong email address or your mailbox is too full. In addition, it may be that your ISP may have a maximum size for emails to receive.

The manual is sent by email. Check your email

If you have not received an email with the manual within fifteen minutes, it may be that you have a entered a wrong email address or that your ISP has set a maximum size to receive email that is smaller than the size of the manual.

The email address you have provided is not correct.

Please check the email address and correct it.

Your question is posted on this page

Would you like to receive an email when new answers and questions are posted? Please enter your email address.


Info