ADB-1
1 2
1 2
Outdoor-unit:
Indoor-unit:
It is ver
F
Acc
The door chime kit comes with:
● 1 x Receiver ● 1
● 1 x 3 volts CR2032 batt ● 1 x Double-sided adhesive tape
● 1 x Instruction Manual
Pictures for Accessories
Model NO:
WIRELESS DOOR CHIME KIT INSTRUCTION MANU
A
Names for Parts
(1) Melody Selec (2) (3) Hanging Hole
(4) Speaker (5) Battery Cover (6) Push Butt
(7) Nameplate C
(8) Silica gel stopper and screw
(9) F (10) Standby holes f
(11) Inter
Notes before Installation
1.
screwdriv
2.
3.
bathroom.
How to use the door chime kit?
Pr
and sound
anywhere at home (only indoor use).
is transmitted through a number of w
the operating range
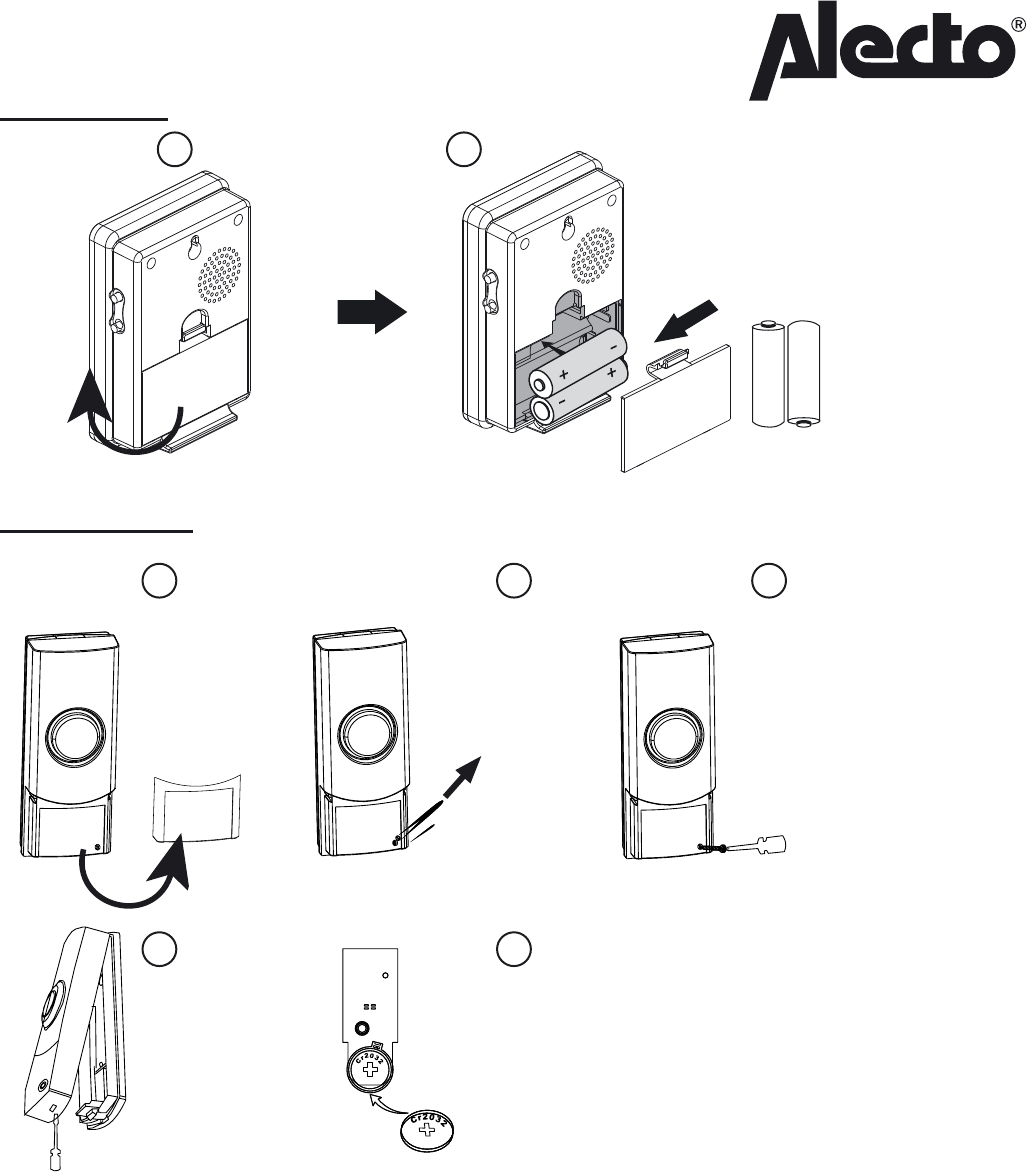
Battery Installation
T
1.
2.
3.
4.
front co
5.
6.
7.
8.
Receiv
Remove the ba
internal markings.
Auto-learning Code Set Up
The door chime kit is equipped with an auto-learning code ability
Auto-learning C
Nameplate
There is a nameplat
User needs to remo
information.
Impor
1.
2.
operation range
3.
4.
5.
6.
User Hints
If the Receiver does not sound
● Fla
● Wr
● Units are out of range-Opera
Specification
A. T
P
B. Rec
P
Operating
Operating Distance:
Selec
Digital Code
What is Auto-learning C
The
memorize the signal as an operation code
Auto-learning C
The Door Chime Kit is equipped with auto-learning operation code ability
1.
After battery installation on both
a new operation code
registered and memoriz
2.
After battery installation on the two
on each
sound
only way f
(If user press the push button on each
generate a new oper
registered and memoriz
3.
reason):
Remove the ba
the batteries
4.
(a) Remove the ba
(b) Load the batt
registration.
(c) Pr
operation codes r
that new operation c
maximum 5 operation codes after batt
T
means,
(d) It is impor
will need to follo
Notes:
(a) If the Receiver sounds f
inter
(b) 1 Receiver can only w
missing
as instruction above
IMPORT
REPLACING BA
1 2 3
4 5 6
T Double-side
adhesive
Instruction Manual
Battery
Receiver fr Receiver back side
(1)
(2)
(5)
(3)
(4)
Receiver
2x1.5V AA
Alkaline Batter
T
1.
mentioned befor
the screws on the wall at suitable heigh
reduce the transmitting r
2.
1
2
Receiv
F
back of the unit.
sources (e
Impor
is within operating range
Note:
Functions Instruction
Door Chime O
Pr
will sound
Hold the button in will NO
Melody Selec
There is a melody selector located at right side of the door chime
differen
V
There is a v
high,
Receiver
(11)
(10)
(9)
(7)
(8)
(6)
T
cov
T
cov
CR2032 Battery
W
T
IMPORT
that you ma
It is ver
F
Acc
The door chime kit comes with:
● 1 x Receiver ● 1
● 1 x 3 volts CR2032 batt ● 1 x Double-sided adhesive tape
● 1 x Instruction Manual
Pictures for Accessories
Model NO:
WIRELESS DOOR CHIME KIT INSTRUCTION MANU
A
Names for Parts
(1) Melody Selec (2) (3) Hanging Hole
(4) Speaker (5) Battery Cover (6) Push Butt
(7) Nameplate C
(8) Silica gel stopper and screw
(9) F (10) Standby holes f
(11) Inter
Notes before Installation
1.
screwdriv
2.
3.
bathroom.
How to use the door chime kit?
Pr
and sound
anywhere at home (only indoor use).
is transmitted through a number of w
the operating range
Battery Installation
T
1.
2.
3.
4.
front co
5.
6.
7.
8.
Receiv
Remove the ba
internal markings.
Auto-learning Code Set Up
The door chime kit is equipped with an auto-learning code ability
Auto-learning C
Nameplate
There is a nameplat
User needs to remo
information.
Impor
1.
2.
operation range
3.
4.
5.
6.
User Hints
If the Receiver does not sound
● Fla
● Wr
● Units are out of range-Opera
Specification
A. T
P
B. Rec
P
Operating
Operating Distance:
Selec
Digital Code
What is Auto-learning C
The
memorize the signal as an operation code
Auto-learning C
The Door Chime Kit is equipped with auto-learning operation code ability
1.
After battery installation on both
a new operation code
registered and memoriz
2.
After battery installation on the two
on each
sound
only way f
(If user press the push button on each
generate a new oper
registered and memoriz
3.
reason):
Remove the ba
the batteries
4.
(a) Remove the ba
(b) Load the batt
registration.
(c) Pr
operation codes r
that new operation c
maximum 5 operation codes after batt
T
means,
(d) It is impor
will need to follo
Notes:
(a) If the Receiver sounds f
inter
(b) 1 Receiver can only w
missing
as instruction above
IMPORT
REPLACING BA
1 2 3
4 5 6
T Double-side
adhesive
Instruction Manual
Battery
Receiver fr Receiver back side
(1)
(2)
(5)
(3)
(4)
Receiver
2x1.5V AA
Alkaline Batter
T
1.
mentioned befor
the screws on the wall at suitable heigh
reduce the transmitting r
2.
1
2
Receiv
F
back of the unit.
sources (e
Impor
is within operating range
Note:
Functions Instruction
Door Chime O
Pr
will sound
Hold the button in will NO
Melody Selec
There is a melody selector located at right side of the door chime
differen
V
There is a v
high,
Receiver
(11)
(10)
(9)
(7)
(8)
(6)
T
cov
T
cov
CR2032 Battery
W
T
IMPORT
that you ma
3
It is ver
F
Acc
The door chime kit comes with:
● 1 x Receiver ● 1
● 1 x 3 volts CR2032 batt ● 1 x Double-sided adhesive tape
● 1 x Instruction Manual
Pictures for Accessories
Model NO:
WIRELESS DOOR CHIME KIT INSTRUCTION MANU
A
Names for Parts
(1) Melody Selec (2) (3) Hanging Hole
(4) Speaker (5) Battery Cover (6) Push Butt
(7) Nameplate C
(8) Silica gel stopper and screw
(9) F (10) Standby holes f
(11) Inter
Notes before Installation
1.
screwdriv
2.
3.
bathroom.
How to use the door chime kit?
Pr
and sound
anywhere at home (only indoor use).
is transmitted through a number of w
the operating range
Battery Installation
T
1.
2.
3.
4.
front co
5.
6.
7.
8.
Receiv
Remove the ba
internal markings.
Auto-learning Code Set Up
The door chime kit is equipped with an auto-learning code ability
Auto-learning C
Nameplate
There is a nameplat
User needs to remo
information.
Impor
1.
2.
operation range
3.
4.
5.
6.
User Hints
If the Receiver does not sound
● Fla
● Wr
● Units are out of range-Opera
Specification
A. T
P
B. Rec
P
Operating
Operating Distance:
Selec
Digital Code
What is Auto-learning C
The
memorize the signal as an operation code
Auto-learning C
The Door Chime Kit is equipped with auto-learning operation code ability
1.
After battery installation on both
a new operation code
registered and memoriz
2.
After battery installation on the two
on each
sound
only way f
(If user press the push button on each
generate a new oper
registered and memoriz
3.
reason):
Remove the ba
the batteries
4.
(a) Remove the ba
(b) Load the batt
registration.
(c) Pr
operation codes r
that new operation c
maximum 5 operation codes after batt
T
means,
(d) It is impor
will need to follo
Notes:
(a) If the Receiver sounds f
inter
(b) 1 Receiver can only w
missing
as instruction above
IMPORT
REPLACING BA
1 2 3
4 5 6
T Double-side
adhesive
Instruction Manual
Battery
Receiver fr Receiver back side
(1)
(2)
(5)
(3)
(4)
Receiver
2x1.5V AA
Alkaline Batter
T
1.
mentioned befor
the screws on the wall at suitable heigh
reduce the transmitting r
2.
1
2
Receiv
F
back of the unit.
sources (e
Impor
is within operating range
Note:
Functions Instruction
Door Chime O
Pr
will sound
Hold the button in will NO
Melody Selec
There is a melody selector located at right side of the door chime
differen
V
There is a v
high,
Receiver
(11)
(10)
(9)
(7)
(8)
(6)
T
cov
T
cov
CR2032 Battery
W
T
IMPORT
that you ma
4 5