GRABACION + E
Este aparato tiene dos archives de grabacion (A y B). Se puede grabar
hasta unos 4 minutes de 50 grabaciones en cada archivo de grabaci6n.
la
4
2
1
3
■ STOP
RECIPLAY
F PLAYISCAN
ENREGISTREMENT + E
Cet appareil a deux fichiers d’enregistrement (A et B). Vous pouvez
enregistrer jusqu’a 4 minutes sur 50 plages d’enregistrement clans chaque
fichier.
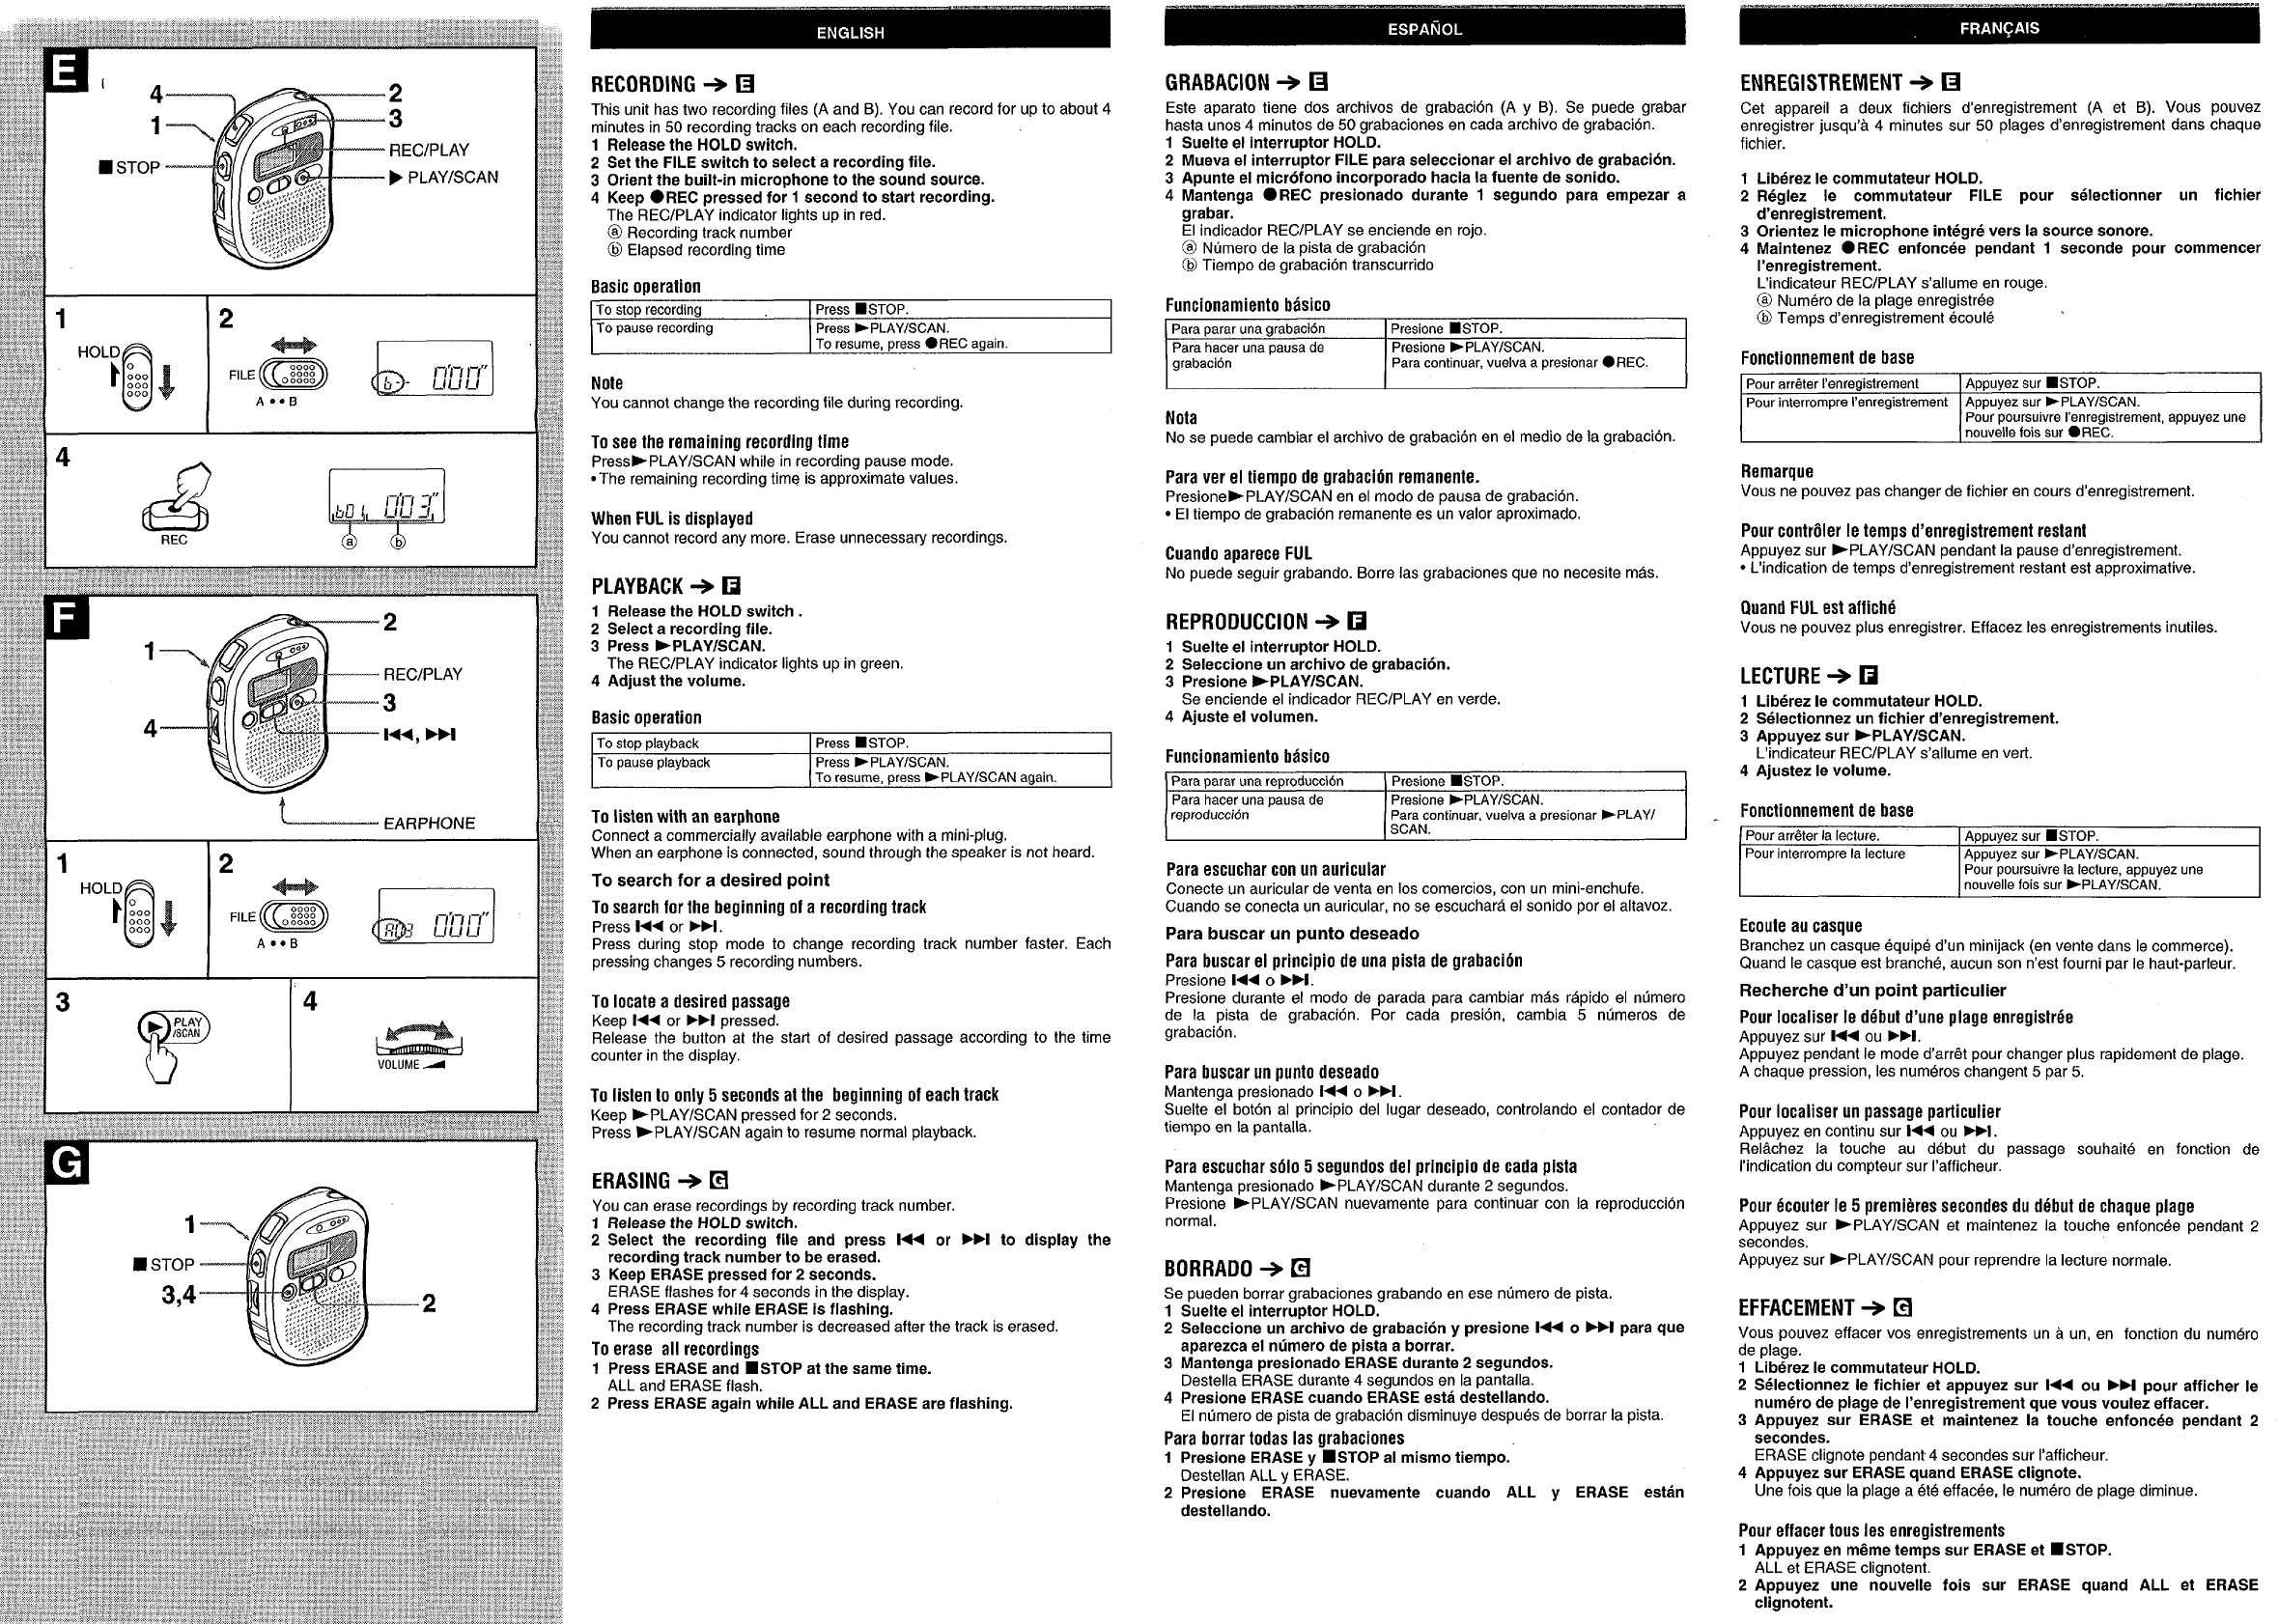
RECORDING + E
This unit has two recording files (A and B). You can record for up to about 4
minutes
in 50 recordincr tracks on each recordirm file.
1
2
3
4
Release the HOLD ;witch.
Set the FILE switch to select a recording file.
Orient
the built-in microphone to the sound source.
Kee~
●REC Dressed for 1 second to start recording.
1
2
3
4
Suelte el interruptor
HOLD.
Mueva el interruptor FILE para seleccionar el archivo de grabaci6n.
Apunte el micr6fono incorporado hacia la fuente de sonido.
Mantenga
●REC presionado durante 1 segundo para empezar a
1 Liberez Ie commutateur HOLD.
2 Reglez Ie commutateur FILE pour selectionner un fichier
d’enregistrement.
3 Orientez Ie microphone integre vers la source sonore.
4 Maintenez
●REC enfoncee pendant 1 seconde pour commencer
I’enregistrement.
L’indicateur REC/PLAY s’allume en rouge,
@ Numero de la plage enregistree
@ Temps d’enregistrement ecoule ‘
The”REC/PLA; indicator lights up in red.
@ Recording track number
@ Elapsed recording time
grabar.
El indicador REC/PLAY se enciende en rojo.
@ Numero de la pista de grabacion
@ Tiempo de grabacion transcurrido
Basic ooeralion
To stop recording Press ■.STOP.
To pause recording
Press *PLAY/SCAN.
To resume. oress
●REC aoain.
Funcionamiento basico
Para parar una grabaci6n
Presione
■STOP.
Para hater una pausa de
Presione bPLAY/SCAN.
grabacion
Para confinuar, vuelva a presionar
● REC.
1
12
HOLD
D
‘$
0
000
000
000
4i!iiij ~=]
A*. B
Fonctionnement de base
Note
You cannot change the recording tile during recording.
Pour arr6ter I’enregistrement
] Appuyez sur
■ STOP.
Pour interrom!me l’enra~istrement I Amrvez sur FPLAY/SCAN.
Nota
Nose puede cambiar el archivo de grabacidn en el medio de la grabacion.
I
Pour poursuivre I’enregistrament, appuyez une
nouvelle fois sur
● REC.
I
To see the remaining recording time
PressEPLAY/SCAN while in recording pause mode.
● The remaining recording time is approximate values.
Remarque
Vous ne pouvez pas changer de fichier en tours d’enregistrement.
Para ver el tiempo de grabacion remanente.
Presione>PLAY/SCAN
en el modo de pausa de grabacion.
● El tiempo de grabacion remanente es un valor aproximado.
When FUL is displayed
You cannot record any
more. Erase unnecessary recordings.
Pour contr61er Ie temps d’enregistrement restant
Appuyez sur -PLAY/SCAN pendant la pause d’enregistrement.
● I_’indication de temps d’enregistrement restant est approximative,
Cuando aparece FUL
No puede seguir grabando. Borre ias grabaciones
que no necesite mas.
PLAYBACK + H
Quand FULest aftiche
Vous ne pouvez plus enregistrer. Effacez Ies enregistrements inutiles.
1 Release the HOLD switch .
2 Select a recording file.
3 Press -PLAY/SCAN.
The REC/PLAY indicator lights up in green.
4 Adjust the volume.
REPRODUCTION + E
1 Suelte el interruptor HOLD.
2 Sefeccione un archivo de grabacion.
3 Presione
➤ PLAY/SCAN.
Se enciende el indicador REC/PLAY en verde.
4 Ajuste el volumen.
LECTURE + E
1 Lib&ez Ie commutateur HOLD.
2 Selectionnez un fichier d’enregistrement.
3 Appuyez sur -PLAY/SCAN.
L’indicateur REC/PLAY s’allume en vert.
Basic operation
To stop playback I Press ■STOP.
To Dausa Dlavback ] Press >PLAY/SCAN.
Funcionamiento btisico
4 Ajuatez Ie volume.
Para parar una reproduccitm Presione 9STOP.
Para hater una pausa de Presione >PLAY/SCAN.
reproduction
Para confinuar, vualva a presionar EPLAY/
SCAN.
l“”’ I To resume. mess -PLAYLSCAN aaain. I
Fonctionnement de base
To listen with an earphone
Connect a commercially available earphone wifh a mini-piug.
When an earphone is connected, sound through the speaker is not heard.
To search for a desired point
To search
for the beginning of a recording track
Press 1<< or W.
Press during stop mode to change recording track number faster. Each
pressing changes 5 recording numbers.
Pour arr6ter la lecture.
I Appuyez sur I STOP.
Pour interrompre la lecture
I Appuyez sur -PLAY/SCAN.
2
‘Ki5iiib ~=J
,4.*B
Para escuchar con un auricuiar
Conecte un auricular de venta en Ios comercios, con un mini-enchufe.
Cuando se conecta un auricular, no se escucharA el sonido por el altavoz.
I
Pour poursuivre la Iectura, appuyez une
nouvelle fois sur >PLAY/SCAN.
I
Ecoute au casque
Branchez
un casque equipe d’un minijack (en vente clans Ie commerce).
Quand Ie casque est branche, aucun son n’est fourni par Ie haut-parleur.
Para buscar un punto deseado
Para buscar el principio de una pista de grabacion
Presione 1440 ➤M.
Presione durante et
modo de parada para cambiar m&s rApido el ndmero
de la pista de grabacion. Por cada presion, cambia 5 numeros de
grabaci6n.
Recherche d’un point particuiier
1’4
To locate a desired passage
Keep 1<< or ➤M pressed.
Release the button at the start of desired passage according to the time
counter in the display.
Pour Iocaliser Ie ddbut d’une plage enregistr6e
Appuyez sur l<< ou ➤>1.
Appuyez pendant Ie mode d’arr~t pour changer plus rapidement de plage,
A chaque pression, Ies num&os changent 5 par 5.
Para buscar
un punto deseado
Mantenga presionado 1+ o ➤PI.
Suelte el boton al principio del Iugar deseado, controlando el contador de
tiempo en la pantalla.
To listen to only 5 seconds at the beginning of each track
Keep -PLAY/SCAN pressed for 2 seconds,
Press PPLAY/SCAN again to resume normal playback.
Pour Iocaliser un passage particulier
Appuyez en continu sur }44 ou -1.
Re15.chez la touche au debut
du passage souhaik$ en fonction de
I’indication du compteur sur I’afficheur.
Para escuchar SLVO5 segundos del principio de cada pista
Mantenga presionado -PLAY/SCAN durante 2 segundos.
Presione -PLAY/SCAN nuevamente para continuar con la reproduction
normal.
ERASING + ❑
You can erase recordings by recording track number.
1 Release the HOLD switch.
2 Select the recording file and press
144 or ➤*I to display the
recording track number to be erased.
3 Keep ERASE pressed for 2 seconds.
ERASE flashes for 4 seconds in the display.
4 Press ERASE while ERASE is flaehing.
The recording track number is decreased after the track is erased.
To erase ail recordings
1 Press ERASE and ■ STOP at the same time.
ALL and ERASE flash.
2 Press ERASE again while ALL and ERASE are flashing,
Pour ecouter Ie 5 premieres secondes du debut de chaque plage
Appuyez sur >PLAY/SCAN et maintenez la touche enfoncc$e pendant 2
secondes.
Appuyez sur EPLAY/SCAN pour reprendre la lecture normale.
BORRADO + ❑
Se pueden borrar grabaciones grabando en ese numero de pista.
1 Suelte el interruptor HOLD.
2 Salecciona un archivo de grabacion y presione 1< 0-1 para que
aparezca el nfimero de pista a borrar.
3 Mantenga presionado ERASE durante 2 segundos.
Destella ERASE durante 4 segundos en la pantalla.
4 Presione ERASE cuando ERASE estti destellando.
El numero de pista de grabacion disminuye desprk de borrar la pista.
EFFACEMENT + ❑
Vous pouvez effacer vos enregistrements un a un, en fonction du numdro
de plage.
1 Liberez Ie commutateur HOLD.
2 S61ectionnez Ie fichier et appuyez sur H< ou W pour afficher Ie
numr$ro de plage de I’enregistrement que vous votdez effacer.
3 Appuyez sur ERASE et maintenez la touche enfoncee pendant 2
secondes.
ERASE clignote pendant 4 secondes sur I’afficheur.
4 Appuyez sur ERASE quand ERASE clignote.
Une fois que la plage a eta effacee, Ie numero de plage diminue.
Para borrar todas Ias grabaciones
1 Presione ERASE y ■ STOP al mismo tiempo.
Destellan ALL y ERASE.
2 Presione ERASE nuevamente cuando ALL y ERASE estan
destellando.
Pour effacer tous ies enregistrements
1 Appuyez
en meme temps sur ERASE at ■ STOP.
ALL et ERASE clignotent.
2 Appuyez une nouvelle fois sur ERASE quand ALL et ERASE
clignotent.